Generate PDF and DOCX Documents
Use document generation when you want Folderit to create a PDF or DOCX document from a filled eForm record.
For example, you can use it to generate a client agreement, incident report, application, certificate, HR document, finance document, or other document where the layout stays mostly the same but the values change.
This tutorial shows how to set it up and use it.
Before you start
You need:
- an existing eForm;
- Admin access to Form templates;
- an ODT file to use as the document template;
- at least one filled eForm record for testing.
The template file must be an ODT file. The generated document can be PDF and/or DOCX.
Step 1: Open Form templates
Go to:
Admin tools → Form templates
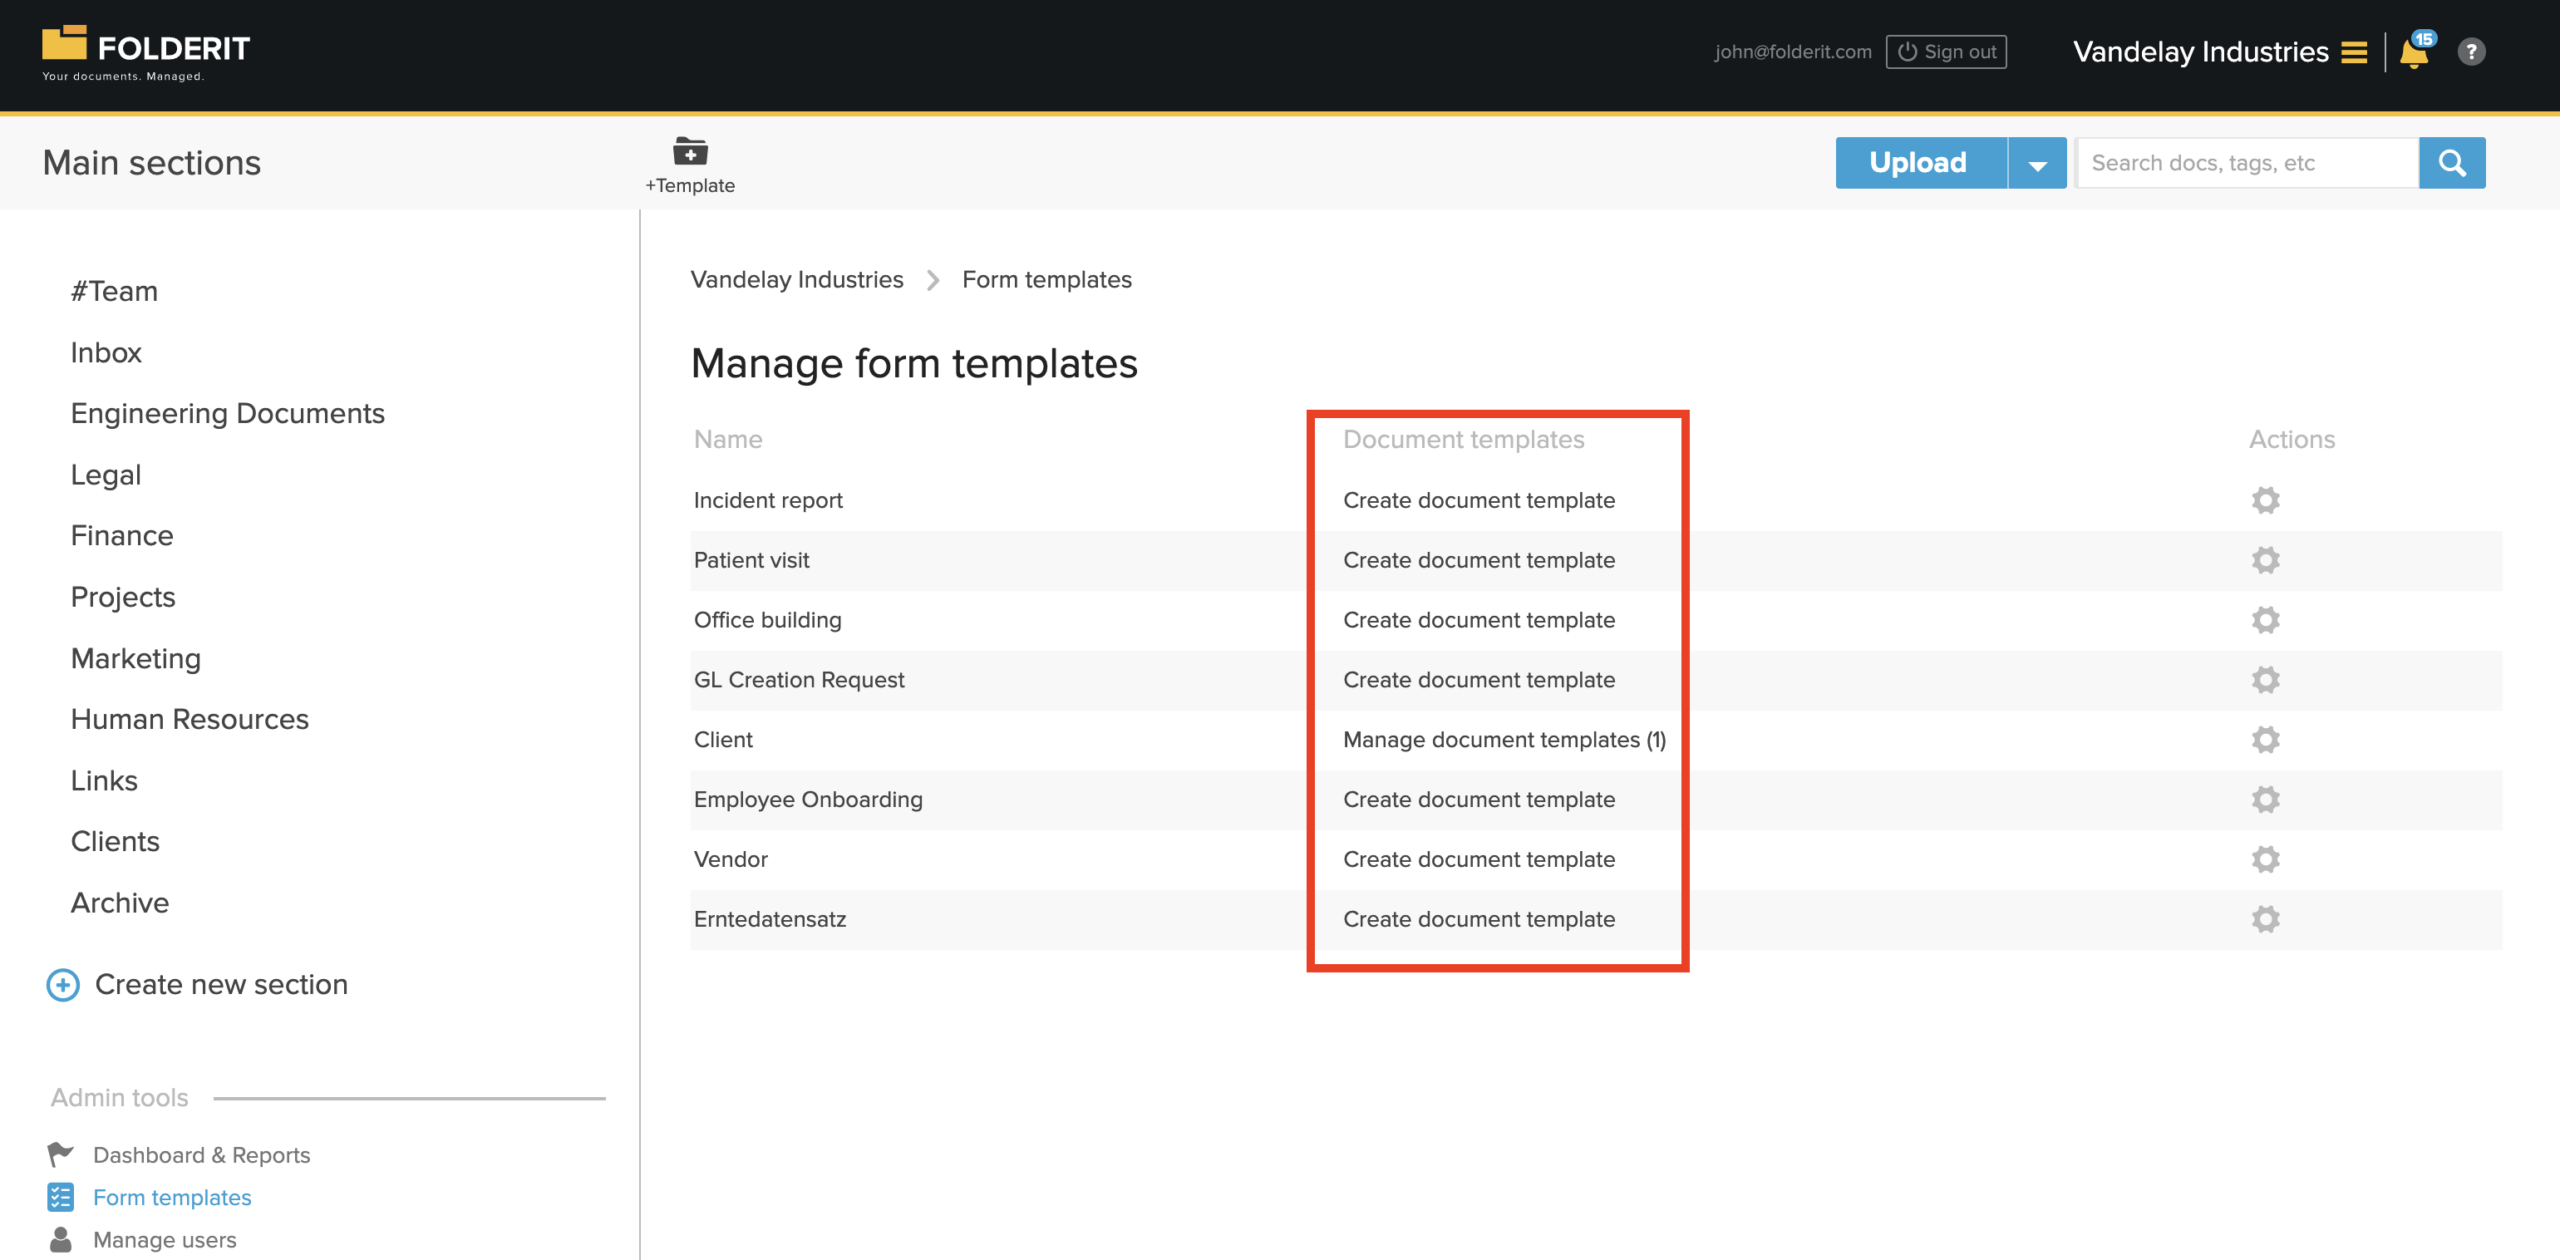
You will see a list of existing form templates.
Each form template can have one or more document generation templates connected to it.
Step 2: Choose the eForm
Find the eForm you want to use.
Example:
Client
Click:
Create document template
If the form already has document templates, click:
Manage document templates
Then add a new document generation template.
Step 3: Fill in the document generation template settings
The setup page contains the fields needed to create the document generation template.
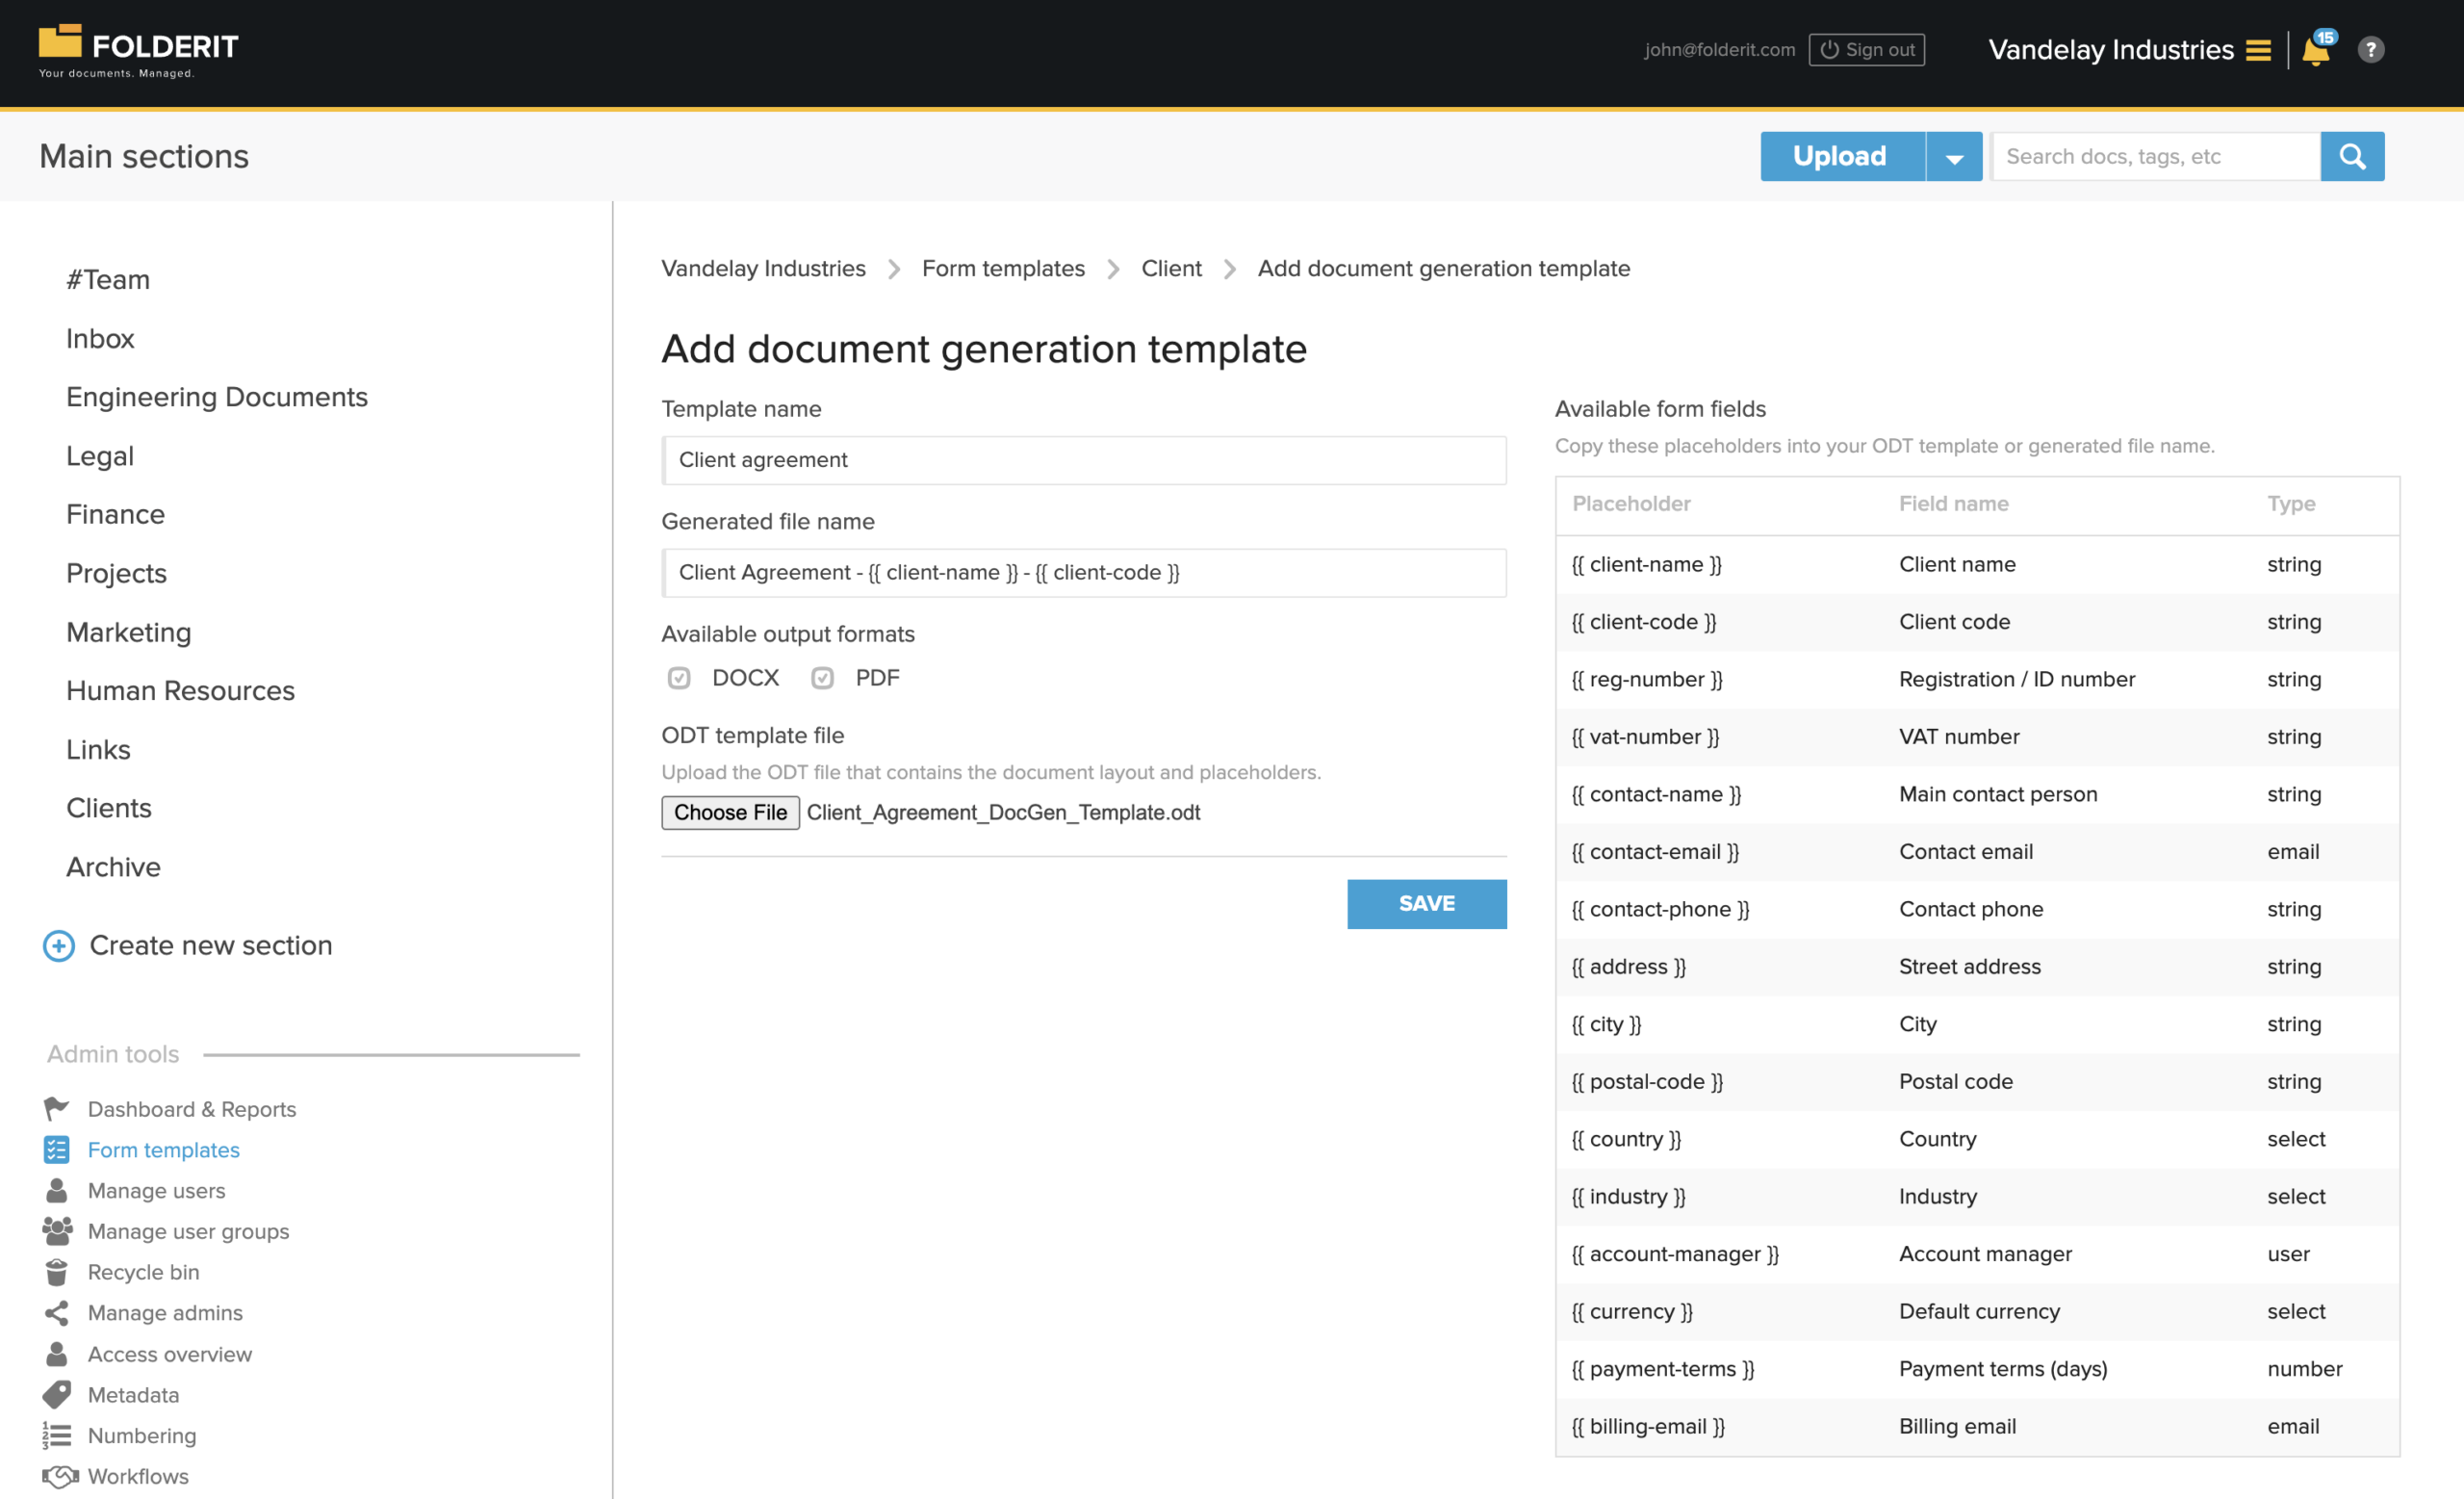
Template name
Enter the name users will see when generating the document.
Examples:
- Client agreement
- Incident report
- Employee onboarding letter
- Loan application
- Certificate
Use a clear name so users understand what document will be created.
Generated file name
Enter the file name pattern for the generated PDF or DOCX. You can use normal text and placeholders from the form fields.
Example:Client Agreement - {{ client_name }} - {{ client_code }}
When generated, this could become:Client Agreement - Nordpeak Solutions GmbH - NPS-001.pdf
Use the exact placeholders shown in the Available form fields table. Do not rename or change them manually.
Available output formats
Select which formats users can generate:
- DOCX
Select one or both.
Use PDF for final documents.
Use DOCX if users may need an editable Word document.
ODT template file
Upload the ODT file that contains the document layout and placeholders.
The ODT file controls how the generated document looks.
Step 4: Create the ODT template file
Create the template on your computer using LibreOffice Writer or another editor that can save ODT files. Prepare the document like a normal business document. You can include:
- title;
- logo;
- headings;
- paragraphs;
- tables;
- signature areas;
- terms and conditions;
- page numbers;
- placeholders.
Save the file as:
ODF Text Document (.odt)
Do not upload a PDF or DOCX as the template file. The template must be ODT.
Step 5: Add placeholders to the ODT template
On the right side of the setup page, you will see Available form fields.
This table shows the placeholders you can use. In this example:
| Placeholder | Field name | Type |
|---|---|---|
{{ client_name }} | Client name | string |
{{ client_code }} | Client code | string |
{{ contact_email }} | Contact email | |
{{ payment_terms }} | Payment terms | number |
Copy the placeholder exactly as shown.
Paste it into the ODT template where that value should appear.
Example text in the ODT template:This agreement is made with {{ client_name }}, registration number {{ reg_number }}, located at {{ address }}, {{ city }}, {{ country }}.
When the document is generated, Folderit replaces the placeholders with values from the filled eForm record.
Example generated result:This agreement is made with Nordpeak Solutions GmbH, registration number HRB 482761, located at Friedrichstrasse 128, Berlin, Germany.
Step 6: Upload and save the template
After the ODT file is ready:
- Return to the document generation template setup page.
- Enter the Template name.
- Enter the Generated file name.
- Select the output formats.
- Click Choose File under ODT template file.
- Select your ODT file.
- Click Save.
The document generation template is now connected to the selected eForm.
Step 7: Create a filled eForm record
- Go to the folder where the eForm record should be created.
- Click the arrow next to Upload.
- Select the relevant eForm.
- Fill in the form fields.
- Submit the form.
- Folderit creates a new record in the current folder.
- This record contains the data that will be used for document generation.
Step 8: Open the submitted record
Open the filled eForm record.
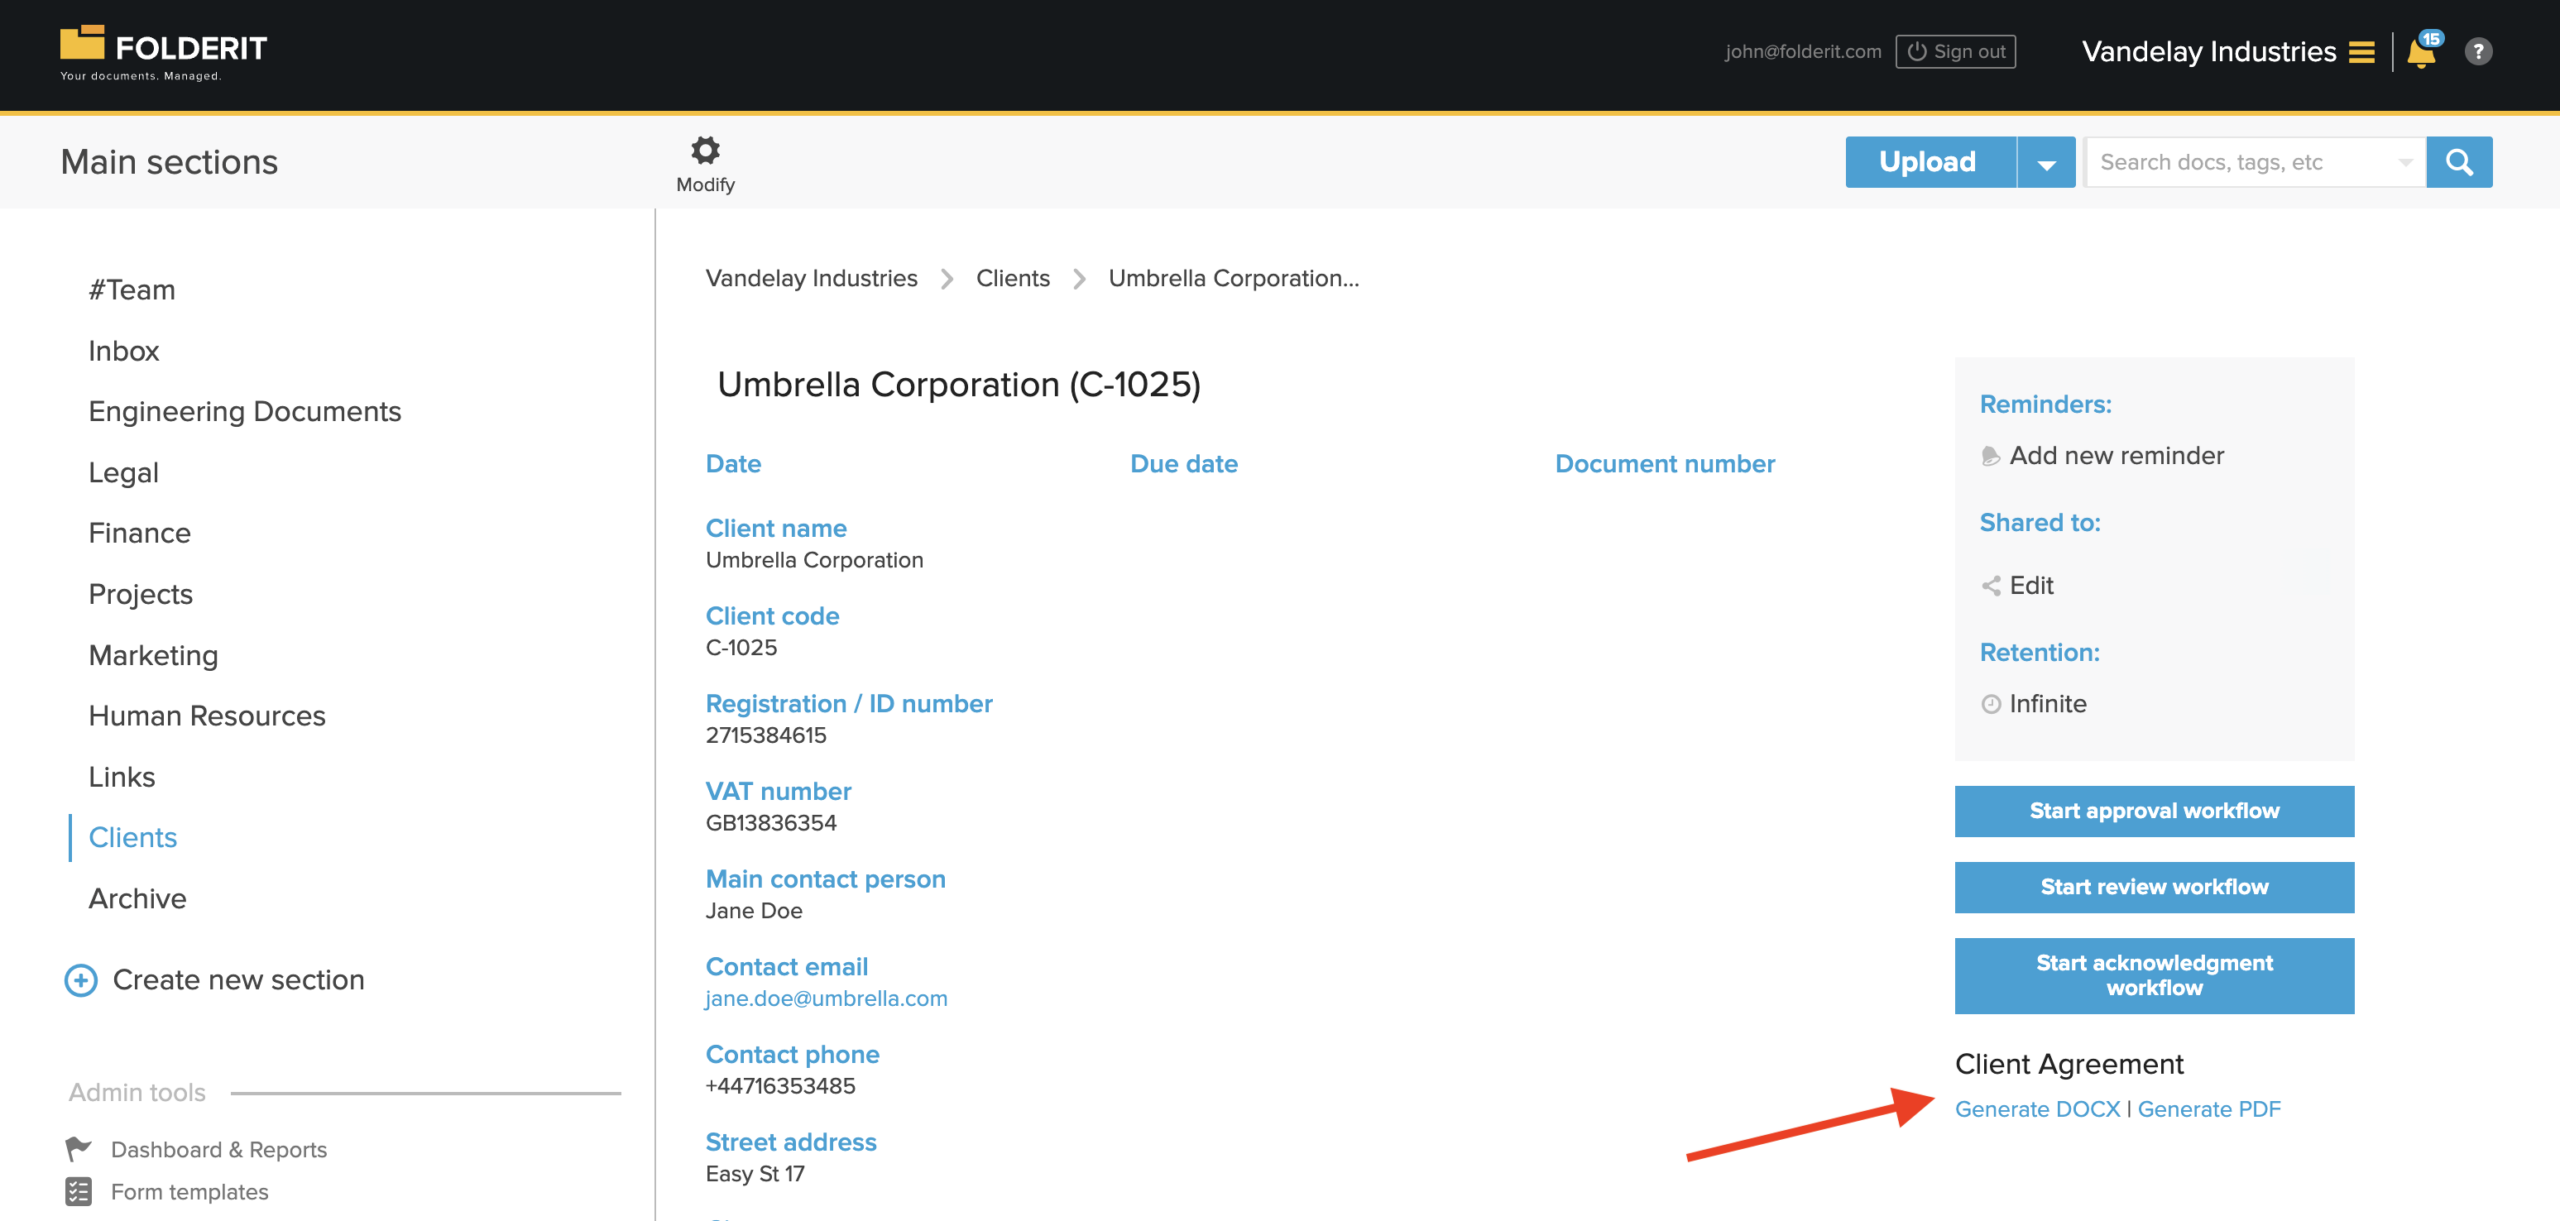
On the record view, you will see the available document generation template.
Example:
Client agreement
Below it, you may see options such as: Generate DOCX / Generate PDF.
These options appear based on the output formats selected in the document generation template setup.
Step 9: Generate the document
Click the format you want:
Generate DOCX or Generate PDF
Folderit creates the document using:
- the submitted eForm data;
- the ODT template;
- the placeholders inside the template;
- the generated file name pattern.
Step 10: Use the generated document
Depending on the available options, the generated document can be:
- stored in Folderit;
- downloaded as PDF;
- downloaded as DOCX;
- emailed from Folderit to a recipient.
If the generated document is stored in Folderit, it becomes a normal managed document.
You can then use Folderit features such as:
- sharing;
- access control;
- audit trail;
- version history;
- retention;
- approval workflows;
- acknowledgement workflows;
- Folderit eSign;
- DocuSign integration.
Example: Client agreement
A Client eForm may contain these fields:
- Client name;
- Client code;
- Registration / ID number;
- VAT number;
- Main contact person;
- Contact email;
- Street address;
- City;
- Postal code;
- Country;
- Default currency;
- Payment terms.
The ODT template may contain this text:
This Client Agreement is entered into with {{ client_name }}, registration number {{ reg_number }}, VAT number {{ vat_number }}, located at {{ address }}, {{ postal_code }} {{ city }}, {{ country }}.
The main contact person is {{ contact_name }}. The billing email is {{ billing_email }}.
The default currency is {{ currency }}. Payment terms are {{ payment_terms }} days.
The generated document may show:
This Client Agreement is entered into with Nordpeak Solutions GmbH, registration number HRB 482761, VAT number DE318945672, located at Friedrichstrasse 128, 10117 Berlin, Germany.
The main contact person is Anna Schneider. The billing email is billing@nordpeak-example.com.
The default currency is EUR. Payment terms are 30 days.
Template tips
- Use simple layouts.
- Copy placeholders from Folderit instead of typing them manually.
- Keep each placeholder in one piece.
Correct:
{{ client_name }}
Incorrect:
{{ client_name }}
- Do not split placeholders across lines, text boxes, or table cells.
- Use clear generated file names.
- Test the template before using it in real work.
Testing checklist
Before using a new document generation template in production:
- Create a test eForm record.
- Fill in all important fields.
- Generate DOCX.
- Generate PDF.
- Check that all placeholders are replaced.
- Check that the generated file name is correct.
- Check layout, spacing, tables, and page breaks.
- Store the generated document in Folderit if that option will be used.
- Test email sending if that option will be used.
- Test workflows if the generated document will need approval, review, acknowledgement, or signing.
Troubleshooting
A placeholder is not replaced
Check that the placeholder was copied exactly from the Available form fields table. Also check that the field has a value in the submitted eForm record.
The generated file name is wrong
Check the Generated file name field in the document generation template setup. Make sure all placeholders used in the file name belong to the selected eForm.
The template does not upload
Check that the file is saved as .odt.
The document layout looks wrong
Open the ODT file in LibreOffice Writer and simplify the layout. Avoid complex text boxes, overlapping objects, unusual pasted formatting, and broken placeholders.
The wrong document template appears on the record
Go to: Admin tools → Form templates
Open the document templates for the relevant eForm and check which templates are connected to it.
Summary
To generate documents from eForm data:
- Create or choose an eForm.
- Create an ODT template with placeholders.
- Upload the ODT template as a document generation template.
- Fill and submit the eForm.
- Open the submitted record.
- Generate PDF or DOCX.
- Store, download, email, or process the generated document in Folderit.