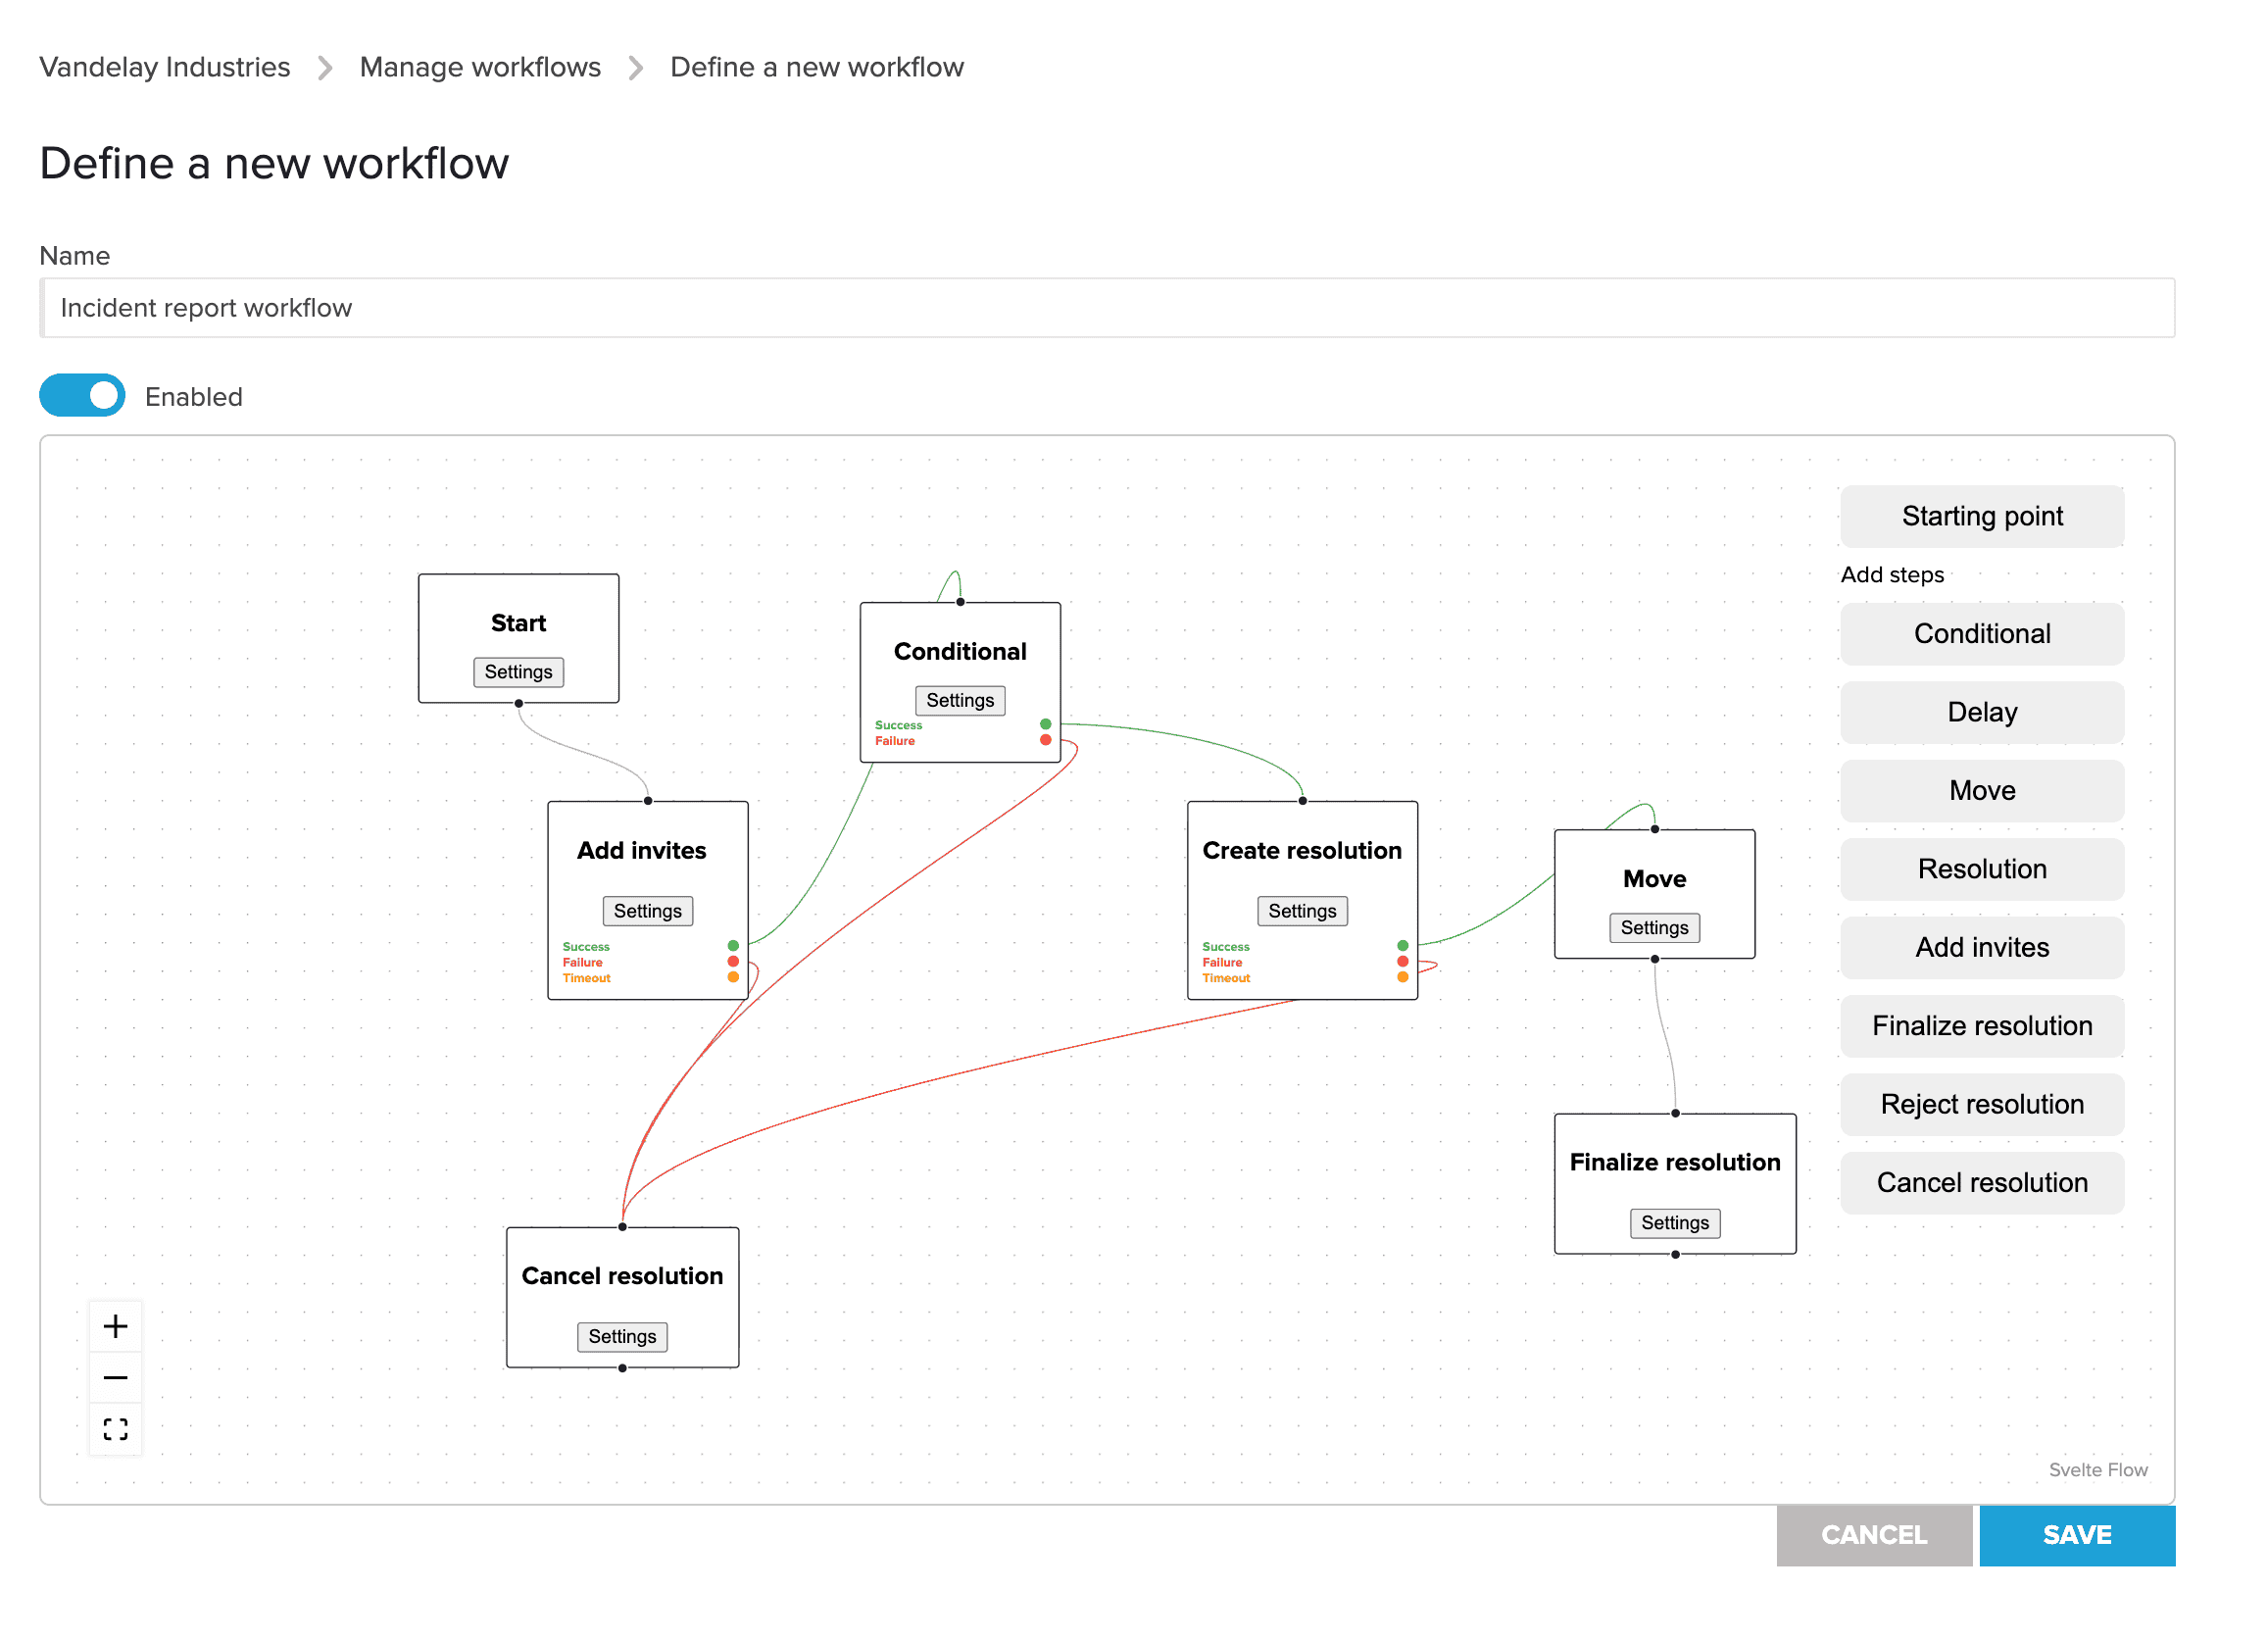
Workflow Designer
Folderit’s Workflow Designer lets you automate document control using a visual, drag-and-drop canvas. You choose what should trigger a workflow, add rules and timing, and then route items through actions like moving them to another folder or starting a resolution (Approval, Review, Acknowledgement, Folderit eSign, DocuSign, eID).
What you can do with the Workflow Designer
Typical use cases include:
- Start an approval automatically when a new file version is uploaded
- Move documents through lifecycle folders (Draft → Review → Approved)
- React to changes in metadata, tags, and relations
- Control and review external sharing (Share added/updated/deleted)
- Trigger follow-up actions when a resolution finishes or when someone responds
Open the Workflow Designer
- Go to Manage workflows.
- Click Define a new workflow.
- Enter a Name for the workflow.
- Enable the workflow when you’re ready to use it.
How workflows are structured
A workflow is a set of connected steps on a canvas. Each step performs an action or decision, and the connections determine what happens next.
Workflows can act on these entity types:
- File
- Folder
- Link
Available steps include:
- Start
- Conditional
- Delay
- Move
- Create resolution
- Add invites
- Finalize resolution
- Reject resolution
- Cancel resolution
Step 1: Configure the Start step (trigger)
The Start step defines when the workflow runs. You can select one or more events and optionally add conditions to restrict the scope.
1) Add one or more events
Click Add event and select the trigger(s). You can add multiple events to a single workflow.
Available events include:
Entity lifecycle and structure
- Entity created
- Entity deleted
- Entity restored
- Entity moved
Entity field changes
- Entity date changed
- Entity due date changed
- Entity description changed
- Entity name changed
- Entity note changed
- Entity number changed
Metadata, tags, relations
- Entity meta added
- Entity meta deleted
- Entity meta value changed
- Entity tag added
- Entity tag deleted
- Entity relation added
- Entity relation deleted
File versioning and signing participants
- File version new
- File version deleted
- File version restored
- File signee added
- File signee deleted
Folder and link events
- Folder language changed
- Folder meta updated
- Link address changed
- Link embedded changed
Sharing events
- Share added
- Share deleted
- Share updated
Resolution (workflow) events
- Resolution finished
- Resolution response
2) (Optional) Add Start conditions (filters)
Under Conditions, click Add condition. If you leave Conditions empty, the workflow runs for every matching event.
- Entity type (File / Folder / Link)
- Entity name (operator like contains + optional case sensitivity)
- Source of event (useful for resolution-based filtering)
- Location (destination + recursion depth)
- Conditional (nested condition groups)
Step 2: Add Conditional logic (route the workflow)
Use Conditional steps to branch your workflow (if/else logic). Conditional steps output two paths: Success (match) and Failure (no match).
1) Add rules
A Conditional step can evaluate multiple conditions, including:
- Entity type: File / Folder / Link
- Entity name: operator (for example contains) with optional case sensitivity
- Source of event: source type (for example resolution), resolution status, and optional resolution UID
- Location: destination ID and recursion depth (use -1 for all subfolders).
Example: Location = Contracts, recursion depth = -1 means ‘Contracts and everything under it’. - Conditional: nested condition group
2) Use AND/OR logic (including nesting)
Condition groups can use AND or OR. You can also nest Conditional groups to build more advanced logic (Conditional inside Conditional).
Step 3: Add Delay steps (timing)
Delay pauses the workflow for a defined amount of time, then continues to the next step.
- Seconds
- Minutes
- Hours
- Days
- Weeks
Common uses include giving reviewers time before a follow-up runs, or waiting before moving an item to the next lifecycle folder.
Step 4: Move items automatically
Move routes the current entity to a selected destination folder.
- Add a Move step.
- Click Select destination and choose the destination folder in the picker.
This is ideal for folder-based lifecycle states, for example Drafts → In review → Approved → Archived.
Step 5: Create a resolution (Approval, Review, Signing, Acknowledgement)
Create resolution starts a formal workflow (“resolution”) on the current entity.
1) Choose the resolution Type
- Parallel
- Serial
- Custom
2) Choose the Method
- Approval
- Review
- Acknowledgement
- eSign
- DocuSign
- eID
3) Add details and options
- Note: instructions for participants
- Show meta: include metadata in the resolution view
- Show related entities: include related items during the resolution
- Keep active: keep the resolution active (if enabled)
4) Set a Timeout
Timeout supports Seconds, Minutes, Hours, Days, and Weeks. A timeout controls the resolution timing. If you need to route items based on what happened in the resolution, use the Resolution finished / Resolution response triggers (see the examples below).
5) Add invites (participants)
Invite participants as an email address (external), user (internal), or group (internal). You can mix email + user + group in the same resolution.
Advanced: on a user/group invite row, the pencil icon switches the selector into a UID field. This helps when you want stable targeting even if display names change.
Step 6: Add invites (optional step)
Add invites lets you add participants after a resolution is created.
You can configure the method (Approval, Review, Acknowledgement, eSign, DocuSign, eID), set an optional timeout, and then add email/user/group invites. Invite rows can also be switched into UID mode using the pencil icon.
Outputs: Add invites supports routing based on outcomes:
- Success
- Failure
- Timeout
Step 7: Finalize, Reject, or Cancel a resolution
Use these steps to control resolution outcomes by method:
- Finalize resolution
- Reject resolution
- Cancel resolution
A common pattern is to trigger routing actions on Resolution finished or Resolution response, filter by status, and then move the item into the right lifecycle folder.
These steps change the resolution state; they don’t replace routing logic—use them together with a Resolution finished/response workflow when you need folder routing
Example workflows
Example 1: Contract approval with lifecycle routing (recommended pattern)
Goal: When a new contract version is uploaded, start an approval. When the approval finishes, route the file based on the outcome.
Workflow A (start the approval)
- Start event: File version new
- Start conditions: Entity type = File, Location = Contracts (recursion depth -1)
- Steps: (Optional) Conditional: Entity name contains “Contract” → Create resolution (Type: Parallel, Method: Approval, Invites: Legal group + Finance group, Timeout: 3 Days)
Workflow B (route after the approval finishes)
Create a second workflow that reacts to the resolution outcome:
- Start event: Resolution finished (or Resolution response)
- Start conditions: Source of event = resolution, and filter by the relevant method/status as needed
- Steps: Conditional branch on resolution status → Move to Contracts/Approved or Contracts/Rework or Contracts/Escalation
Example 2: Policy acknowledgement after an update
Goal: When a policy is updated, require staff acknowledgement.
- Start event: File version new
- Start conditions: Location = Policies (recursion depth -1)
- Steps: Create resolution (Type: Parallel or Serial, Method: Acknowledgement, Invites: All staff group, Timeout: 2 Weeks) → (Optional) Move to Policies/Acknowledged
Example 3: Review new shares in a confidential area
Goal: When a share is added in a sensitive folder, route it for review.
- Start event: Share added
- Start conditions: Location = Confidential (recursion depth -1)
- Steps: Move → Confidential/Shared externally – review → Create resolution (Type: Parallel, Method: Approval, Invites: Security group, Timeout: 1 Day)
Troubleshooting
The workflow triggers too often
Add Start conditions. Entity type and Location are usually the fastest filters.
The workflow does not trigger
- Confirm the workflow is enabled.
- Confirm the correct Start event is selected.
- If using Location filtering, confirm Destination ID and recursion depth.
The wrong people are invited
Verify the invites (user/group vs UID) and confirm group membership is up to date.
Next steps
Start with one folder lifecycle (for example Drafts → Approved), then add Conditional routing and resolution steps as your process matures.
If you share your process goal (trigger + folder + expected outcome), we can turn it into a ready-to-publish recipe workflow in the same format.